FRONT DOOR (w/ Power Window) > ADJUSTMENT |

for Preparation Click here
- HINT:
- Before adjusting the positions of doors on vehicles equipped with side airbags and curtain shield airbags, be sure to disconnect the cable from the negative battery terminal. After making adjustments, inspect the SRS warning lamp, the side airbag system and the curtain shield airbag system for normal operation (Click here).
- Use the same procedure for both the RH and LH sides.
The procedures listed below are for the LH side.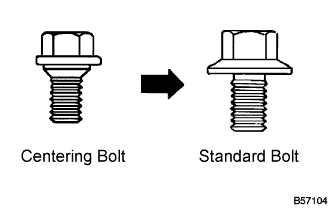
- Centering bolts are used to mount the door hinge onto the vehicle body and door. The doors cannot be adjusted with the centering bolts on. Substitute the standard bolts (with washers) for the centering bolts when making adjustments.
- For bolts without torque specifications, check the standard bolt chart (Click here).
| 1. INSPECT FRONT DOOR PANEL SUB-ASSEMBLY LH (for Double Cab) |
Check that the clearance measurements of areas A to J are within the standard ranges.
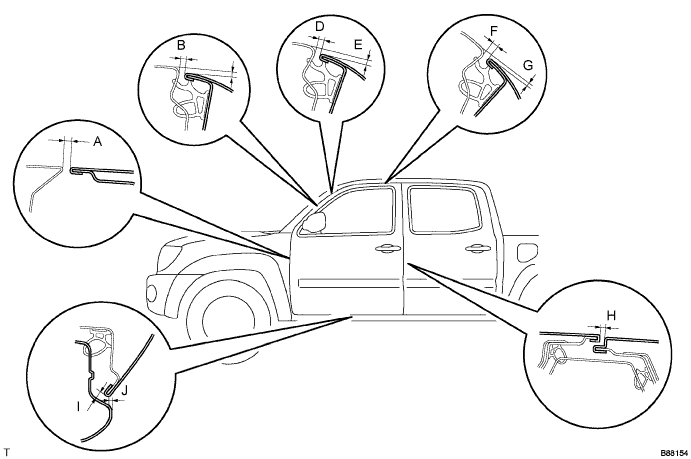
Standard: Area Measurement Area Measurement A 4.6 +- 1.5 mm (0.181 +- 0.059 in.) F 5.0 +- 1.5 mm (0.197 +- 0.059 in.) B 5.0 +- 1.5 mm (0.197 +- 0.059 in.) G 1.9 +- 1.5 mm (0.075 +- 0.059 in.) C 3.0 +- 1.5 mm (0.118 +- 0.059 in.) H 5.0 +- 1.5 mm (0.197 +- 0.059 in.) D 5.0 +- 1.5 mm (0.197 +- 0.059 in.) I 5.0 +- 1.5 mm (0.197 +- 0.059 in.) E 2.7 +- 1.5 mm (0.106 +- 0.059 in.) J 2.0 +- 1.5 mm (0.079 +- 0.059 in.)
| 2. INSPECT FRONT DOOR PANEL SUB-ASSEMBLY LH (for Access Cab) |
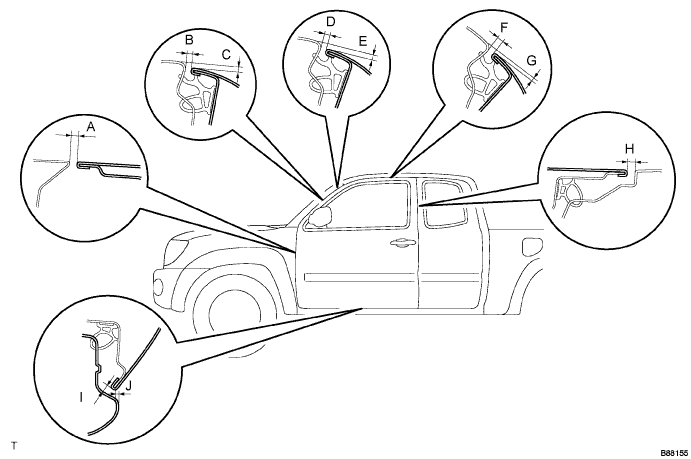
Check that the clearance measurements of areas A to J are within the standard ranges.
Standard: Area Measurement Area Measurement A 4.6 +- 1.5 mm (0.181 +- 0.059 in.) F 5.0 +- 1.5 mm (0.197 +- 0.059 in.) B 5.0 +- 1.5 mm (0.197 +- 0.059 in.) G 1.9 +- 1.5 mm (0.075 +- 0.059 in.) C 3.0 +- 1.5mm (0.118 +- 0.059 in.) H 6.0 +- 1.5mm (0.236 +- 0.059 in.) D 5.0 +- 1.5 mm (0.197 +- 0.059 in.) I 5.0 +- 1.5mm (0.197 +- 0.059 in.) E 2.7 +- 1.5mm (0.106 +- 0.059 in.) J 2.0 +- 1.5mm (0.079 +- 0.059 in.)
| 3. ADJUST FRONT DOOR PANEL SUB-ASSEMBLY LH |
Disconnect the cable from the negative battery terminal.
- CAUTION:
- Work must be started at least 90 seconds after the ignition switch is turned to OFF and and the cable is disconnected from the negative battery terminal. (The SRS is equipped with a back-up power source. If work is started within 90 seconds of disconnecting the cable from the negative battery terminal and the ignition switch being turned to OFF, the SRS may deploy.)
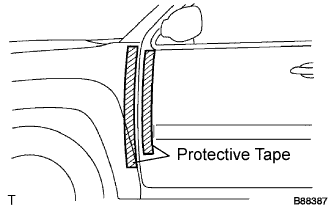
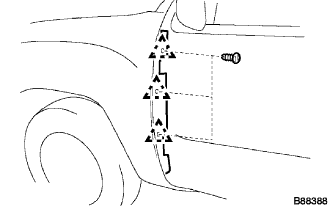
Apply strips of protective tape to the door panel and fender panel, as shown in the illustration.
 |
Open the door, and then disengage the 3 clips.
- HINT:
- If any clips are damaged, replace them with new ones.
 |
Remove the front fender side panel protector LH from the gap between the fender and door.
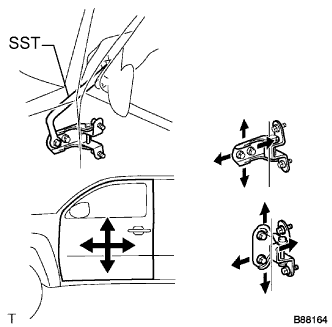
Using SST, adjust the door horizontally and vertically by loosening the body side hinge bolts.
- SST
- 09812-00010
 |
Tighten the body side hinge bolts after the adjustment.
- Torque:
- 26 N*m{ 265 kgf*cm , 19 ft.*lbf }
Horizontally and vertically adjust the door by loosening the door side hinge bolts.
 |
Tighten the door side hinge bolts after the adjustment.
- Torque:
- 26 N*m{ 265 kgf*cm , 19 ft.*lbf }
Adjust the striker position by slightly loosening the striker mounting screws with a torx socket wrench T40 and hitting the striker with a plastic hammer.
 |
Using a torx socket wrench T40, tighten the striker mounting screws after the adjustment.
- Torque:
- 23 N*m{ 235 kgf*cm , 17 ft.*lbf }
Install the front fender side panel protector LH with the 3 clips.
|
Connect the cable to the negative battery terminal.
- Torque:
- 5.4 N*m{ 55 kgf*cm , 48 in.*lbf }
Inspect the SRS warning lamp (Click here)